To use SlingStudio with the SlingStudio Console for Mac app, here's a list of the gear that you'll need:
- SlingStudio device, with all included cables
- SlingStudio Battery Pack (optional)—For more information, see All about the SlingStudio Battery, which is linked at the end of this article.
- A compatible Mac computer. (A list of all compatible devices is in the article What devices is SlingStudio compatible with? linked below.
- SlingStudio Console for Mac, available for free from the SlingStudio Downloads page, located under Help in the website banner.
- Additional equipment of your choosing:
- Apple iPhone/iPod touch device(s), and/or Android smartphone(s), to serve as additional video sources with the free SlingStudio Capture app. See the article What devices is SlingStudio compatible with? linked below.
- SlingStudio CameraLink (enables HDMI cameras to connect to SlingStudio via Wi-Fi ... more info is linked below.)
- HDMI camera (SDI cameras with no HDMI-out ports require an SDI-to-HDMI adapter)
- SlingStudio USB-C Adapter product, sold separately (for more information, see the article What is the function of the SlingStudio USB-C Expander? linked below).
- Compliant SD card (inserted into the SlingStudio unit) or a compliant USB hard disk connected via the optional SlingStudio USB-C Adapter product.
For more information, see Best practices for using SD cards and Best practices for using USB drives linked below.
Note: You only need external storage if you're recording program files. External storage is not required if you are only live-streaming your project. You can stream uninterrupted even when storage media is removed, becomes full, or experiences an error. - Internet connection (either via Wi-Fi or via Ethernet cable with the optional USB-C Adapter product) for live broadcasting to Facebook, YouTube, or another streaming service.
- Microphone (requires microphone pre-amp or audio mixer)
- Audio mixer (optional)
To get started, first download and install the necessary SlingStudio apps as mentioned above, and then hook up the equipment:
- Download the free SlingStudio Console app for your supported Mac from the SlingStudio Downloads page, located under Help in the website banner.
- To use iOS or Android smartphones as video devices, download the free SlingStudio Capture app to each smartphone from either the Apple App Store for supported iOS devices, or from the Google Play store for supported Android phones.
- Prepare any HDMI cameras that you'd like to use as video sources.
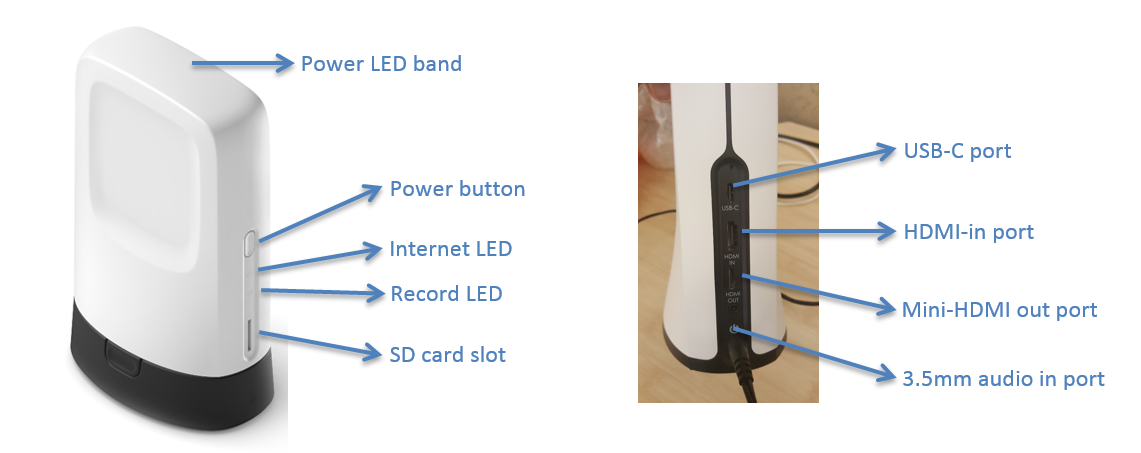
- If you are going to be uploading your project to Facebook, YouTube, or another online site, or if you are going to be broadcasting live video, and you have Internet access via an Ethernet network cable, use a SlingStudio USB-C Adapter to connect the Ethernet cable to the SlingStudio USB-C input.
(If you are going to be using Wi-Fi for broadcasting or streaming, that's covered in an upcoming step.) - If you'd like to use external audio input equipment (instead of, or in addition to, any audio that comes from your video sources), connect a pre-amplified microphone or an audio mixer to the SlingStudio 3.5 mm unbalanced audio line input.
- If you want to watch a larger display of the program output or a quad view of your inputs, you can also connect a video output monitor to SlingStudio device's Mini-HDMI (Type C) output.
- Once the hardware is connected, plug in the SlingStudio to AC power.
If you want to use the optional SlingStudio Battery, attach it to the bottom of the SlingStudio to begin charging it.
The SlingStudio power adapter both charges the Battery Pack and powers the SlingStudio itself. - The SlingStudio device's blue LED band blinks while it is starting up. Wait until it stops blinking and glows steadily before proceeding.
- Click the Wi-Fi icon at the top edge of the Mac screen. From the dropdown list, select the SlingStudio hotspot.
Don't see any Wi-Fi icon? From the Apple menu, choose System Preferences. Click Network, then Wi-Fi. From the Network Name dropdown list, choose the SlingStudio hotspot. - Select the Wi-Fi network that looks like SlingStudio XX_XX_XX, where the X characters are 0-9 or A-F (the actual numbers are different for every SlingStudio device).
- Open the SlingStudio Console app on the Mac. If the Console app tells you that the SlingStudio requires a firmware update, follow the onscreen instructions to install it.
- If desired, provide a unique name and password for the SlingStudio device hotspot, as well as a password for the SlingStudio hotspot. (Unique names are optional, but these can be helpful for identifying and protecting the SlingStudio hotspot.) The SlingStudio device restarts after changes are made to these settings.
- After SlingStudio restarts, you'll need to set your Mac to connect to the SlingStudio hotspot again.
Click the Wi-Fi icon at the top edge of the Mac screen. From the dropdown list, select the SlingStudio hotspot.
Don't see any Wi-Fi icon? From the Apple menu, choose System Preferences. Click Network, then Wi-Fi. From the Network Name dropdown list, choose the SlingStudio hotspot. - If you're using the SlingStudio Capture app on smartphones, then you'll set them up to connect to the SlingStudio Wi-Fi hotspot the same way as your Mac.
- Place your smartphones in their desired locations (for better connectivity, higher is better). Adjust the Capture app settings to your liking (positioning, zoom settings, focus, exposure, etc.).
You're now ready to proceed with the rest of your project.
For more information on getting started, see the links below.

