Applying a text overlay to your project is a great way to point out specific things in your project, as well as giving it a professional touch.
To apply a text overlay to a project:
- Get your project ready to go, with all video sources connected.
- Launch SlingStudio Console.
- Click a video source so that it appears in Preview.
- In the GRAPHICS section, click + at the far right end of the section.
A popup menu appears.
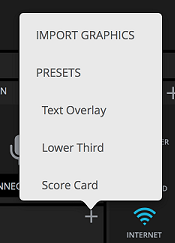
- Choose Text Overlay.
You see a variety of controls appear. - Use these text controls to create the text overlay that you'd like.
- When you're done, click SAVE. A new graphic image with your text appears in the GRAPHICS section.
- Click this new graphic image to place the text in your Preview image.
- You can move the text around, or delete it if you've changed your mind.
- To edit the text, mouse over its graphic image in the GRAPHICS section. Click the menu […] icon in the upper-right corner of the image, then choose Edit from the popup menu.
- Once you're satisfied with your onscreen text, tap Preview -> Program. The overlay text displays in your program.

