If you have video clips in MP4 or MOV format on an SD card or a USB drive, you can import these video clips into your SlingStudio project.
After you import video clips into SlingStudio Console, you can choose up to two (2) of them to appear as video sources.
When a video clip is selected for the Preview window, SlingStudio Console can be set to play the clip automatically as soon as it is promoted from Preview to Program. You can also switch from one video clip to another.
How many clips can you import?
You can import as many video clips as you like. SlingStudio Console lets you import clips in batches of up to ten (10) video clips at a time. If you want to import more than 10 clips, then keep importing in batches of up to 10 video clips at a time until they're all imported.
Once the clips are imported, they appear in the ACTIVE VIDEO SOURCES list under VIDEO CLIPS. You can then choose up to two (2) of these video clips to appear as video sources for your project, making the video clips available for use in your project just like any other video source.
To use video clips other than the two that you've chosen to be active video sources, first remove one (or both) of the video clips from the VIDEO SOURCES list. You can then replace them with other video clips that are in the VIDEO SOURCES list.
What kinds of video clips can I use?
SlingStudio Console supports video clips with these specs:
| File Types: | MP4, MOV |
| Maximum File Size: | 4 GB |
| Bit rate (in KB/sec, max): | 30,000 |
| Maximum Resolution: | 1920 x 1080 |
| Minimum Resolution: | 100 x 100 |
| Video Codec: | H264 (Profile – Baseline, Main, and High; Level – up to 4.1) |
| Audio Sample Rates (in Hz): | 32,000, 44,100, 48,000 |
Audio Channel Count (max):
| 2 (stereo) |
| Audio Codec: | AAC (Profile-LC) |
Importing video clips
Before you begin importing video clips, it's a good idea to look around and see what clips you have, and what you'd like to work with.
Some tips:
- Prepare by copying the video clip(s) to the storage device (SD card or USB drive) that you use with your SlingStudio.
- It's helpful to create a dedicated folder for your video clips; when you're importing them, it's easier to locate them when they're in one place.
- It's often easiest to locate the video clips folder if you place it at the root level of the disk. But it can reside anywhere on your storage media.
To import video clips into your SlingStudio project: - Connect your storage media to your SlingStudio unit:
- Insert your SD card into the SlingStudio unit;
- Or connect your USB storage drive to the SlingStudio unit using the SlingStudio USB-C Expander product.
- In SlingStudio Console, create (or reopen) your project.
- In the VIDEO SOURCES section, click the + symbol in the upper-right corner.
The All Video Sources/ACTIVE VIDEO SOURCES window opens. - Toward the bottom, next to VIDEO CLIPS, click ADD.
- Navigate through your storage media to your video clip(s).
- When you locate the clip(s) that you want to use with your project, click to select the one(s) that you want.
Note: There is no limit to the total number of video clips that you can import, but the import process can only handle up to 10 video clips at a time. To import more than 10 clips, repeat the import process (starting at Step 4, above) as needed to import the remaining video clips that you want to use. - You can now do two things:
- COPY TO SLINGSTUDIO: This option copies the clip to the SlingStudio unit's internal storage, and therefore makes the clip available to any project that you work with, including the currently-open project. However, this option takes up space on your SlingStudio unit's internal storage (which has a capacity of 40 GB).
- ADD TO PROJECT: This option makes video clips available to projects via links to the clips' locations on your storage media. This conserves disk space on your SlingStudio, but any imported video clip(s) can only be used with the currently-open project. If you want to use the clip(s) with any other project, then you'll need to import the video clip(s) again for that project.
- Click the button of your choice, and then click OK in the progress box that appears when the operation is complete.
You now see the video clip(s) appear under VIDEO CLIPS in the All Video Sources/ACTIVE VIDEO SOURCES window. - If you wish, repeat the process to add more video clips (up to 10 video clips per import batch).
- From the VIDEO CLIPS list, click the imported video clip(s) that you want to use as video sources for your project.
The video clip(s) that you click become video source(s).
You can now close the All Video Sources/ACTIVE VIDEO SOURCES window. - If you want, you can review the video clip(s) by playing/pausing the clip(s) in the VIDEO SOURCES panes.
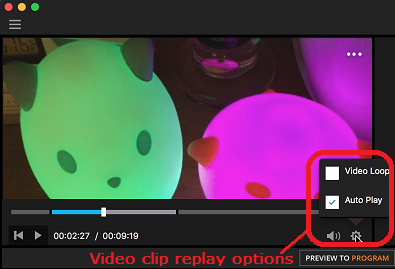
- Want to enable the Video Loop or Auto-Play features?
- From the upper-right corner of the VIDEO SOURCES pane for the video clip, click the menu icon (three horizontal dots) then select VIDEO CLIP SETTINGS.
The Video Clip Settings popup menu appears.
- Choose to enable/disable the Video Loop and Auto Play features, then click SAVE.
- Click the video clip to put it in the PREVIEW window.
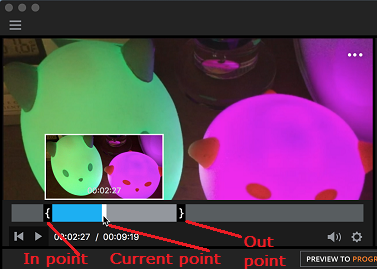
Note that a strip of video clip controls appear at the bottom of the PREVIEW window. - You can use these controls to:
- Adjust in- and out-points for your video clip.
Do that by putting your pointer over the timeline, then dragging the left and right curly brackets to create in- and out-points:
- You can also tap Settings (the gear icon) to enable/disable the Auto Play feature. You can also enable/disable the Video Loop feature, which causes the video clip to play repeatedly.
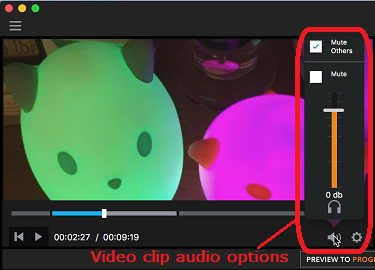
Important to know: Once you promote the video clip from PREVIEW to the PROGRAM window, you can no longer set the in- and out-points, so be sure to do that while the clip is still in the Preview window! (You can use the Pause and Play functions from the Program window, however.) - You can set audio options that are specific to the video clip when you play it in your project.
To do that, click the speaker icon to open the pop-up and see the Video Clip Audio Options:
-
Mute Others: Mutes the audio of all other video sources when this video clip plays in your program.
-
Mute: Mutes the audio of this clip when this video clip plays in your program.
-
Audio level slider: Sets the audio level of this clip when this video clip plays in your program.
Note: These video clip settings within Preview are different from the settings that are within the SlingStudio Console Audio Mixer. The Audio Mixer settings affect the program video source generally. Consider the Video Clip Audio Settings to be prep-up work for audio settings for the clip prior to pushing it to Program.
- As soon as you promote the video from PREVIEW to PROGRAM:
- The video begins playing if Auto Play is enabled. Otherwise you'll need to start playing the video clip manually.
- At the end of the clip:
- SlingStudio Console switches the current PREVIEW video source to PROGRAM if the Video Loop option is deselected and the Auto Play option is selected.
- SlingStudio Console loops the video clip if the Video Loop option is selected.
- Otherwise, the video clip stops playing and you'll need to select another video source for the PREVIEW and PROGRAM windows.
Limitations and warnings:
- You can work with a maximum of two video clips at one time. After that, you need to remove one or both clips before you can add additional ones.
- Video clips with a 1080p60 resolution/frame rate can only be imported using the SlingStudio Console Pro60 (1080p60) video production mode. Video clips with a 1080p60 resolution/frame rate cannot be imported in any of the four other production modes ( Pro30, Sports, Television, or Internet).
- These types of video clips are not supported (and may not be even viewable in SlingStudio Console):
- Video clips with H.265, Apple ProRes contents, or codec formats other than H.264
- Video clips with audio encoding other than AAC-LC
- Video clips with audio sampling rates other than (in Hz): 32,000, 44,100, 48,000
- Video clips with 4K or 8K resolution (see note about 8K files, below)
- When setting in- and out-points in the Preview window, the video clip seek bar works at the I-frame level interval, not the frame level … so the clip may not start playing at the exact frame that you have chosen.
- When importing a video clip with interlaced contents, there is no thumbnail image displayed for that clip under Video Sources. However, the clip should play properly.
- Avoid having any 8K video files on the drive from which you're importing your video clip(s). Even the presence of these 8K video files on the disk could cause SlingStudio Console to quit unexpectedly. To avoid this, make sure that there are no 8K contents on the storage drive that you have connected to your SlingStudio unit.

