Want to add your own JPEG or PNG graphics images to your video production? SlingStudio offers you that option.
IMPORTANT: SlingStudio does not accept graphics files with image sizes larger than 1920 x 1080 pixels. If you want to import a graphic that is larger than this, you must first open the graphic in a graphics image editor on your computer, and then reduce the size of the image to 1920 x 1080 pixels or smaller.
For more information on these topics, see the articles linked below.
To work with external graphics files:
- First, transfer the graphics images to your storage media: Connect your SlingStudio storage media to a computer, then copy your graphics files to the storage media.
Tip: For better organization, create a separate folder/subdirectory on the storage media for the graphics files. You may find it easier to locate your graphics folder later if you create it at the root level of the storage disk, although it can be stored anywhere on the disk. - Remove the storage media from the computer and reinsert/reattach it to your SlingStudio unit.
- Power up your SlingStudio unit, if it is not already running.
- Go to the SlingStudio Console app.
- Open a SlingStudio project, or create a new one with the settings that you want.
- Above the available video sources on the left side of the Console app, you see a GRAPHICS button. Tap it.
- At the bottom of the GRAPHICS section, tap ADD GRAPHICS.
The SlingStudio Add Graphics box opens. - Tap the SlingStudio folder. Tap to open folders as needed to navigate to the location where your graphics files are stored.
- Tap to select the graphics files that you want to use with your production.
- At the bottom of the box, you see two choices:
- ADD TO PROJECT: This option adds references (links) to the graphics file(s) that you want to use with your project. It does not actually copy any files. Instead, it creates references to them, which saves disk space. Graphics files that you add to your project are available for that project only. You'll need to import the graphics files again for any subsequent projects.
- COPY TO SLINGSTUDIO: This option adds graphics files to the internal SlingStudio library, offering the convenience and flexibility of having these graphics for use with any project.
NOTE: The buttons also display the number of graphics files that you have selected for import. That's because SlingStudio can only import up to 10 graphics at a time. If you want to import more than that, repeat the import in batches of 10.
- Tap OK when the importing process is done.
- Tap VIDEO SOURCES and choose a video source so that it appears in the Preview window.
- Tap GRAPHICS and tap to select the graphics image that you want to include.
The image appears in the Preview window on top of your video image. - Tap the image in the Preview window to select it, and then you can move the image around to wherever you choose.
You also see various options:
- Want to remove the image from Preview? Either:
- Tap the X in the upper-right corner of the graphic;
- Or tap the graphic from the left-side GRAPHICS panel a second time.
The image is removed.
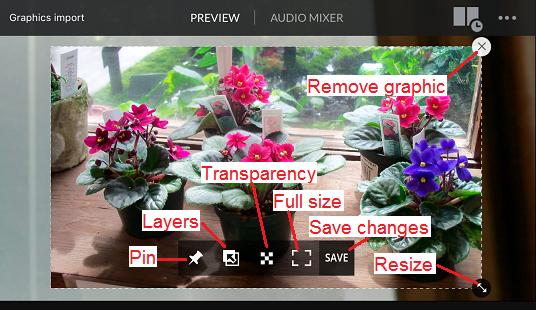
Here are descriptions of each of the graphics tools displayed above:
| Icon | What it does |
| Pin | Retains the graphic within the Program image, no matter which video source is live. Works well for persistent logos in your program image. |
| Layers | Tap to select. When selected, the icon turns blue and the image remains on top of any other inserted graphics. |
| Transparency | Tap to reveal a slider with which you can adjust the transparency of the graphic. |
| Full size | Tap to enlarge the graphic to fill the Preview screen as much as possible. Tap again to revert. |
| Save changes | Save transparency, sizing, and location settings that you have made to the graphic. |
| Resize | Tap and drag to resize the graphic. |
| Remove graphic | Remove the graphic from the Preview window. You can reinsert it at any time. You can also remove a graphic by tapping it a second time in the GRAPHICS panel on the left side of the Console screen. |

